- Landscape:
- Use Wide lens (ranging from 20 to 35mm), Ultra Wide lens (10-22 mm) or Fish Eye lens (15mm) for capturing a wide landscape photo.
- Use Narrow Aperture (larger f/number) between f/8 to f/11 for higher depth of field.
- You can use Manual mode or Aperture Priority mode to set the aperture and adjust other settings for a proper exposure.
- Using a narrow aperture means getting less light on sensors. This needs to be compensated by slowing the shutter speed (like 1/30s) and/or increasing the ISO speed.
- Use the lowest possible ISO that can allow a properly exposed photo at the set Aperture and Shutter Speed.
- After increasing the ISO, if the shutter speed required is still slow, use a tripod to reduce any blurs.
- Compose a landscape photo based on the Rule of Thirds, place the horizon on the top or lower horizontal line and any object like tree or person on the vertical line or the point of intersection of two lines.
- If the sky has vivid clouds and more color, keep the horizon on the bottom line. If the sky is plain and bland, keep the horizon on top line and add a good foreground like a tree or rocks on the bottom line.
- Position the camera properly so that the horizon line comes straight in the photo. Use gridlines to align the horizon or use the Electronic Level if provided in the camera.
- Use Landscape mode in Picture Style Effects (if provided in the camera), which enhances the color of sky and greenery and makes the photo sharper.
- Use a Polarizer filter for darker skies and vivid greenery. It can also remove reflections from water surfaces for a clearer view of things under water, so that a water body appears as crystal clear.
- If the scene is too bright, then use a Neutral Density filter. It limits the amount of light entering the lens and helps to reduce over exposure of the photo. If the foreground needs to be brighter and the background (like the sky & clouds) needs to be darker, then use a Graduated Neutral Density filter. It limits light on one side (e.g. top) and allows light on other side (e.g. bottom), due to which the sky which is in the top part of the photo will appear darker than the foreground or subject which is in the bottom part of the photo.
- For a group shot of people in front of monument or scenery, use the same settings as landscape, but enable flash to illuminate the faces of the subjects and remove any shadows under eyes.
- For a higher dynamic range of light and colors in a landscape, use RAW photo format and HDR technique for a beautiful high contrast photo.
- For capturing an artistic photo of a subject in foreground (like a person, tree or mountain) and a big Sun/Moon in the background, use a long focal length prime or zoom (telephoto) lens.
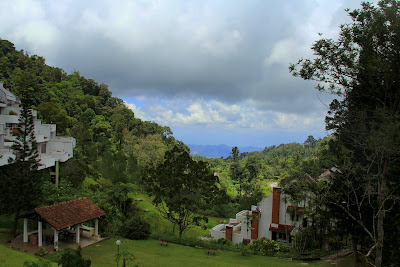 |
| Example of Landscape |
| | Shutter Speed: 1/400s | f-stop: f/8 | ISO: 100 | Focal Length: 18mm | Flash: Not Fired | |
- Night Landscape:
- Use medium Aperture (mid f/number) between f/5.6 to f/8 for high depth of field as well as to get more light in the lens.
- Use a slower shutter speed (e.g. 3s to 30s) for more light.
- To stabilize the camera, a tripod is neccessary. Use a cable release, wireless remote or set the timer to 2 seconds to further reduce the blurs caused by pressing the shutter button.
- You can use Manual mode or Aperture Priority mode to set the aperture and adjust other settings for a proper exposure.
- For more light, set a higher ISO (e.g. ISO 200 to 400). However, use the lowest possible ISO that can allow a properly exposed photo at the set Aperture and Shutter Speed without much noise.
- Enable Long Exposure Noise Reduction setting if available in your camera to reduce the noise in the photo.
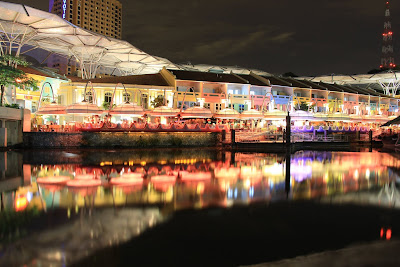 |
| Example of Night Landscape |
| | Shutter Speed: 15s | f-stop: f/5.6 | ISO: 125 | Focal Length: 18mm | Flash: Not Fired | |
Previous Article: Photography Techniques - Portraits & Night Portraits
Next Article: Photography Techniques - Night Traffic

