
Apple launched the iPhone 5 last month which was nearly similar to the speculated one due to high amount of leaked images of it's body and components. Apple had stated that they will increase the secrecy regarding the manufacturing of it's products, however it seems to decrease a lot resulting to the vast amount of leaks from insiders at the factory.
After the release of iPhone 5, analysts have now focused on the next device Apple brings out. As is the case with iPhone 5, there are many rumors floating around along with proofs such as photos of various parts and components of the to-be launched iPad Mini. The speculated date for Apple's invitations to be sent out is October 10th next week (Update 1: Busted, No invitations were sent on October 10th. Update 2: Apple sent invitations on October 16th, 2012.) and the announcement date of the new iPad is speculated to be on October 17th 23rd 2012 (Update: Confirmed, Apple sent out invitations for an event on this date) with release date the week after on November 2nd (Update: Confirmed for WiFi only model), with pre-orders starting on October 26th (Update: Confirmed).
Let us see what are the rumors that are floating around and wait till the launch date to confirm if the rumors are really valid.
| Features | Rumors | Actual (after Event) |
|---|---|---|
| Name | iPad Mini (most probably) or iPad Air or just iPad | Confirmed (iPad Mini it is) |
| LCD Screen | 7.85-inch non-Retina IGZO display (1024x768 resolution) | Confirmed (7.9-inch 1024x768 resolution) |
| Processor | 32nm A5 processor | Confirmed (Dual Core A5 processor) |
| Memory | 512MB of RAM | Unknown as of now. |
| 4G/LTE support | 4G/LTE for the cellular model Update: No 4G/LTE in all models to make it a cheaper product. Speculations about only WiFi models available. | Busted (World LTE option available) |
| Near Field Communication (NFC) | No NFC | Confirmed |
| Camera | Rear and Front facing cameras | Confirmed (5 MP iSight Camera with 1080p video and 1.2 MP FaceTime Camera with 720p video) |
| Battery | 16.7 Whr/4490 mAh 3.72V Battery | Somewhat Confirmed (16.3 Whr Li-Po battery, other details Unknown as of now) |
| Design | 7.2mm thin body with Aluminium back panel possibly in Anodized Black or White color similar to iPhone 5 and thinner bezels on front side. Smaller dual speakers on either side of the Lightning connector with headphone jack at the bottom. Update: More colors available apart from White or Black similar to iPod Touch. | Confirmed (But only in Black & White colors and headphone jack on top.) |
| Dock connector | Lightning Connector | Confirmed |
| SIM card | Nano-SIM card for 3G/LTE Models. Update: Not available if 3G/LTE is not present in all models. | Confirmed (Nano-SIM card for World LTE) |
| Earphones | EarPods included in the package | Busted (No EarPods included) |
| Price | Speculated price $249 onwards (or some say above $300 since the new iPod Touch is $300) Update: iPad Mini price rumored to be leaked as shown in the table below. | Neutral (Price updated in table below and is nearly similiar to the leaked prices) |
| Other Announcements | Revamped 9.7-inch new iPad (iPad 3) which features a Lightning connector and compatible with International LTE frequencies. | Confirmed. Also the New iPad was upgraded with A6X processor, 720p FaceTime Camera, improved LTE compatibility and Lightning connector, revamped as 4th generation iPad. |
| Other Announcements | 13-inch MacBook Pro with Retina Display rumored to be announced at this event. | Confirmed. Also, new versions of iMac and Mac Mini were introduced. |
As the working of Apple is highly secretive (or believed to be) and mysterious, we will only know if these rumors are true when they announce their product in October 2012 (possibly 17th 23rd October). Until then we can only speculate. The list of rumors will be updated after the product launch to bust or confirm the rumors...
Till then, hold on tight!!!
Update 1:
| Type | Size | Price | Actual Price | ||||||||
|---|---|---|---|---|---|---|---|---|---|---|---|
| Wi-Fi | 8GB | €249 ($320) | - | ||||||||
| 16GB | €349 ($450) | $329 | |||||||||
| 32GB | €449 ($580) | $429 | |||||||||
| 64GB | €549 ($710) | $529 | |||||||||
| Cellular+WiFi | 8GB | €349 ($450) | - | ||||||||
| 16GB | €449 ($580) | $459 | |||||||||
| 32GB | €549 ($710) | $559 | |||||||||
| 64GB | €649 ($840) | $659 |
Update 2: Yet again, most of the leaked information about the iPad Mini was found to be mostly accurate.
Friday, September 28, 2012
Photography Techniques - Flowers
- Flowers:
- To capture isolated photos of flowers, use a Macro lens, Prime lens or a Telephoto lens at it's maximum zoom. This will create a very small Depth of Field. With Macro lens, you can get closer to the flowers but with other lenses you need to maintain a minimum focusing distance as per the lens specifications.
- Use a Aperture Priority or Manual mode with a larger aperture (smaller f/number like f/1.8).
- Since the Depth of Field is very small, focusing on one area of the flower may blur out the front and back part of the flower, but will create an interesting effect. If you want the full flower in focus, decrease the Aperture.
- Use a high shutter speed (like 1/500s) if the flowers are swaying in the wind or hold them in position with hands or using a clamp.
- If you are using Macro lens, use a tripod to prevent photo going out of focus. Since the Depth of Field is very low, even a small movement of the camera will make the photo out of focus.
- Do not use flash directly on the flower as this will wash them out. Use a diffuser, a soft source of light or a white sheet of paper in front of the flash. Diffused lighting will give the flowers a soft and natural appearance.
- Morning sun light can create beautiful effects on flowers as it is not as harsh as later in the day. Also, dew drops may be present on the flowers in the morning giving a very interesting touch to the photos.
 |
| Example of Flower Photography |
| | Shutter Speed: 1/200s | f-stop: f/6.3 | ISO: 100 | Focal Length: 80mm | Flash: Not Fired | |
Previous Article: Photography Techniques - Fireworks
Friday, August 10, 2012
Apple iPhone 5 Rumors

It is the time of year that Apple announces its next generation version of iPhone and before a new Apple product comes there are speculations from Apple fans and media of the features the up coming Apple product.
Last year people were expecting an iPhone with a completely new look and larger screen. However, Apple introduced iPhone 4S which has the same design as iPhone 4, but some new features like a better camera and Siri. As is the case with this year's launch, there are many rumors floating around along with proofs such as photos of various parts and components of the to-be launched iPhone and some entries in beta releases of iOS 6. The announcement date of the new iPhone is speculated to be on September 12th 2012 (Update: Confirmed as per Apple's invite) and release date on September 21st (Update: Confirmed).
Let us see what are the rumors that are floating around and wait till the launch date to confirm if the rumors are really valid.
| Features | Rumors | Actual (in September) |
|---|---|---|
| Name | iPhone 5 or the New iPhone. Update: The Apple invite for September 12th event points out to the name iPhone 5 | Confirmed (iPhone 5) |
| LCD Screen | Taller & thinner 16:9 Retina Display (640x1136 resolution) using in-cell technology. | Confirmed |
| Processor | Dual Core A5X with Quad Core Graphics (same as the New iPad but with lower clock speed). Update: Speculations about A6 processor. | Confirmed (A6 processor) |
| Memory | Storage upto 64 GB (same as before). Upgrade in RAM to 1 GB. | Confirmed (upto 64GB storage, 1 GB RAM) |
| 4G/LTE support | Speculations of 4G/LTE support based on the New iPad's support for 4G. | Confirmed |
| Near Field Communication (NFC) | Speculations of NFC & mobile payment support based on the Passbook app (or eWallet) in iOS 6. Update 1: Possibility of fingerprint reader embedded in the phone body for identification/authentication with the Passbook app. Update 2: NFC may not be present in this version, but may be added in future versions of iPhone. | Confirmed (NFC not present) |
| Camera | Upgrade in both cameras. Facetime camera may be positioned centrally. Update: Possibly same 8 MegaPixel rear camera with a bigger aperture than iPhone 4S and HD front facing camera. | Confirmed (same rear camera, same aperture with additional tweaks. Facetime camera with HD 720p) |
| Design | Taller and thinner body with thickness 7.6mm (smaller by 1.7mm than the iPhone 4/4S) having the same design as iPhone 4/4S except with a metal back panel and the 9mm headphone jack moved to bottom. | Confirmed (exactly as was shown in leaks) |
| Dock connector | Smaller 9-pin or 19-pin connector instead of the current 30-pin. | Confirmed (8 signal digital 'Lightning' connector) |
| Battery | Slightly higher capacity battery (1440 mAh 3.8 Volt) for maintaining the larger screen giving the same amount of talk-time as previous models. | Confirmed (better talk-time than previous model, 1440 mAh 3.8 Volt) |
| SIM card | Redesigned SIM card tray for the new nano-SIM card. | Confirmed |
| iPad Mini | Rumors about 7.85-inch iPad Mini coming in late 2012. Update: Announcement possibly in October at a separate event. | Unknown |
| Apple TV | Possibility of new Live TV features for Apple TV. | Unknown |
| AirPlay | Speculated upgrade of AirPlay Direct (or AirPlay 2.0) allow users to wirelessly stream music without the need of a WiFi network using Bluetooth. | Unknown |
| Earphones | Possibility of a fully redesigned earphone. | Confirmed (Earpods) |
As the working of Apple is highly secretive and mysterious, we will only know if these rumors are true when they announce their product in September 2012 (possibly 12th September). Until then we can only speculate. The list of rumors will be updated after the product launch to bust or confirm the rumors...
Till then, hold on tight!!!
Update: Most of the rumors stated above have been confirmed to be true and the iPhone shown at the event was exactly the same as in the leaked photos.
Friday, June 1, 2012
Photography Techniques - Fireworks
- Fireworks:
- To capture the brilliant light trails of a fireworks the settings are similar to Night Traffic photography.
- Use of a tripod is absolutely necessary since the shutter speed is very slow. Also, use of remote release or self timer is very useful to remove the shakes caused by pressing the shutter button on the camera.
- Use Shutter Priority mode to set a slow shutter speed (e.g. 10s) or use the Bulb mode to start capturing the exact moment when the firework starts and stop when it has exploded.
- Use a higher f/number between f/8 and f/16 to ensure that the light streaks are very fine lines of colors and not thick bright lines.
- Set a low ISO (e.g. ISO 100) for minimum noise.
- Use Manual focus since the Auto-focus won't work when you aim at the dark sky. Set the focus to a little less than infinity.
- Enable Long Exposure Noise Reduction setting if available in your camera to reduce the noise in the photo.
- Capture only few bursts of fireworks. Too many bursts will make the photo over exposed and cluttered.
- Add some buildings, landmarks or people in the shot. If you are capturing people (subjects) in front of fireworks, use flash and focus on the subjects. If possible, try to include water bodies like lake, sea or river in the shot to capture the reflections of the fireworks.
- Shoot in landscape orientation for capturing a wide area of multiple fireworks along with some background like buildings. Shoot in portait orientation if you want to shoot only the firework burst.
- Capture shots of the fireworks when they are just started. This way the sky won't be filled with too much smoke which causes the photo to be hazy
- Choose a proper location with wind blowing from the spot towards the fireworks, so that the smoke wont create a hazy photo.
 |
| Portrait, Bulb Mode, No Smoke |
| | Shutter Speed: 9s | f-stop: f/20 | ISO: 100 | Focal Length: 18mm | Flash: Not Fired | |
 |
| Landscape, Bulb Mode (but Cluttered & Smokey) |
| | Shutter Speed: 3s | f-stop: f/16 | ISO: 100 | Focal Length: 18mm | Flash: Not Fired | |
Previous Article: Photography Techniques - Waterfall Silky Water Effect
Next Article: Photography Techniques - Flowers
Photography Techniques - Waterfall Silky Water Effect
- Waterfall/Fountain/Stream Silky Water Effect:
- To create a silky effect on flowing water (in a waterfall, fountain or a river/stream), the shutter speed must be slow to capture the movement of water and blur it. You can use Manual mode or Shutter Priority mode to set the shutter speed and adjust other settings for a proper exposure.
- Different shutter speeds create a different effect in the photo. Slower shutter speed may cause the water to blur more and vice versa. Experiment with the speed as per your creativity. You can use a shutter speed of 0.3s (rougher water) upto 30s (smoother water) for this effect.
- Using a slow shutter speed means that a tripod is necessary for steadying the camera.
- Also, a slower shutter speed means more light entering the lens which may cause the photo to be over exposed. To decrease the amount of light, use a low ISO (like ISO 100) and a smaller aperture i.e. high f/number (like f/8 upto the highest number like f/32). Alternatively, instead of Shutter Priority mode, you can use Aperture Priority mode to set the highest f/number and let the camera decide the shutter speed.
- Using a smaller aperture, the depth of field will be larger and hence the full waterfall will be in focus.
- A Neutral Density filter can be used to limit the amount of light entering the lens so that the image is correctly exposed at slower shutter speeds.
- A Circular Polarizer filter can be used to remove the reflections on water and make it crystal clear with deeper color tones. This filter also limits the light entering the lens enabling a slower shutter speed with correct exposure.
- Shooting under cloudy sky is better than bright sunny sky, since the photo won't be over exposed easily. Also dawn or dusk is better than noon for taking this type of photo.
 |
| Example of Silky Water Effect - Smooth |
| | Shutter Speed: 4s | f-stop: f/11 | ISO: 100 | Focal Length: 20mm | Flash: Not Fired | |
 |
| Example of Silky Water Effect - Smooth |
| | Shutter Speed: 1/6s | f-stop: f/3.5 | ISO: 400 | Focal Length: 18mm | Flash: Not Fired | |
Previous Article: Photography Techniques - Sports
Next Article: Photography Techniques - Fireworks
Sunday, May 13, 2012
Photography Techniques - Sports
- Sports:
For sports photography, a fast and long lens (Prime or Zoom) is extremely beneficial. Lens with around 200mm (or more) focal length is required for long distance shots. Fast lens which can take photos using a wide aperture and very fast shutter speeds are very useful to capture the fast moving sportsmen or cars. Camera/Lens equipped with Image Stabilization and/or tripods are very helpful to reduce shakes in long zoom photos.- In bright lights (outdoor sports), use a smaller aperture (like f/8) and fast shutter speed (like 1/500s) to freeze the subject. ISO can be kept at minimum since there is plenty of light. For this a long range zoom lens is required since the distances are greater.
- In low light condition (indoor sports), fast lens can be very useful to increase the amount of light entering the lens by using wide aperture (like f/2.8). Due to this, the shutter speed can be made faster and ISO need not be increased to very high (which introduces lots of noise at high levels). Also, using a wide aperture means a low depth of field giving a nice blurred background effect to isolate the subject.
- Use Shutter Priority or Manual mode to set the required fast shutter speed.
- Use High Speed Burst mode (continuous drive) to capture more photos at a high frame rate. Use JPG instead of RAW for longer bursts, since size of JPG is much smaller than RAW. In this way, there are less chances of missing a crucial shot.
- Use AI Servo AF (Canon) / AF-C (Nikon) auto focus to focus a fast moving subject (where focusing distance keeps changing) continuously as long as one of the AF point is on the subject.
- Panning:
Panning is a technique used to emphasize the speed of the subject, where the subject is shown as stationery behind the streaks of a fast moving background going in the opposite direction of the subject.
Panning is achieved by keeping the fast moving subject in one position in the frame and moving the camera horizontally (panning) in such a way that the subject remains in the same position in the frame during the time the shutter is open.
If the shutter speed is kept slow, the background appears blurred in one direction due to the camera motion. The shutter speed needed for panning depends on the speed of the subject and varies widely from one type of sports to another. e.g. for an F1 car to be captured using Panning, the shutter speed can be kept faster than the shutter speed used to capture a football player.
For a smooth effect, pan the camera in a smooth motion preferably using a tripod. - Pre-Focus (Catch-in-focus/trap focus):
Pre-Focus is a technique used to capture a fast moving subject at a pre-focussed location after the subject enters the frame. The user sets the focus at a pre-determined location where the subject may appear in due time and when the subject enters the frame, the user captures the photo using a high shutter speed to freeze the subject. This ensures that the subject is captured, properly focussed and sharp.
Trap focus or Catch-in-focus is a technique available in some cameras in which the photo is automatically captured when the subject enters the frame and is in focus. This is achieved by setting a Auto Focus mode called Focus Priority (only available in few DSLRs).

Example of Panning (Slower Shutter Speed & ISO) | Shutter Speed: 1/200s | f-stop: f/5 | ISO: 400 | Focal Length: 70mm | Flash: Not Fired |

Example of Pre-Focus (Faster Shutter Speed & ISO) | Shutter Speed: 1/500s | f-stop: f/7.1 | ISO: 1600 | Focal Length: 35mm | Flash: Not Fired |
Previous Article: Photography Techniques - Light Painting
Next Article: Photography Techniques - Waterfall Silky Water Effect
Photography Techniques - Light Painting
- Light Painting:
Light Painting is a photographic technique in which the light from a moving light source (like candles, torch or fireworks) is captured. The objective is to capture the trail of light as it is moving in a pattern, design or spelled as a word. This can be achieved by either moving the light source or moving the camera while the shutter is open.- To capture the the light trails, the settings are similar to Fireworks photography.
- Use of a tripod is absolutely necessary since the shutter speed is very slow. Also, use of remote release or self timer is very useful to remove the shakes caused by pressing the shutter button on the camera.
- Use Shutter Priority mode to set a slow shutter speed (e.g. 3s to 10s) or use the Bulb mode to start capturing the exact moment when the light source starts and stop when required.
- Use a higher f/number (more than f/8) to ensure that the light streaks are very fine lines of colors and not thick bright lines.
- Set a low ISO (e.g. ISO 100) for minimum noise.
- Use Manual focus if the Auto-focus doesn't work properly in low light conditions.
- Enable Long Exposure Noise Reduction setting if available in your camera to reduce the noise in the photo.
- If you are also capturing a person (subject) along with the light source, use flash to illuminate the subject. The subject needs to hold very still while painting with the light source or they will come out blurry in the photo.
- If you want only the light source painting and don't want the person to appear in the photo, use a small source of light which points the light in the opposite direction of the person (like a torch). The background should be dark (like a darkened room) and no other light sources should illuminate the subject. Disable the flash and ensure that the person wears dark clothes and moves continuously, so that they are not captured for a period of time while the shutter is open.
- An alternative to using a person to shine a light by moving is to paint or write a message on a wall using a laser or torch while the shutter is open.
- Another, technique of light painting is to capture a smoky/soft photo of some objects or a person. This can be achieved by moving the light source or an external flash in a circular motion (or in linear motion) to illuminate the subject. In this way, the harsh shadow of the flash is eliminated giving the subject a soft appearance in the photo.
- Light Painting can also be used to create some illusions like multiple clones of a person in a single photo or a hanging face of a person in the photo. This can be done by using an external flash to illuminate each position of the subject to create multiple exposures of that subject in different areas of the photo or just illuminating the face of the subject keeping the rest of the body in darkness.
 |
| | Shutter Speed: 1s | f-stop: f/6.3 | ISO: 400 | Focal Length: 28mm | Flash: Fired | |
Previous Article: Photography Techniques - Night Traffic
Next Article: Photography Techniques - Sports
Tuesday, May 1, 2012
Photography Techniques - Night Traffic
- Night Traffic:
- If you want to shoot light trails caused by the headlights/taillights of cars on a road, the same settings used in Night Landscape can be used for capturing night traffic photos.
- Use Shutter Priority mode to set the time between 10-20 seconds and let the camera adjust the rest of the settings.
- Use of a tripod is absolutely necessary since the shutter speed is very slow. Also, use of remote release or self timer is very useful to remove the shakes caused by pressing the shutter button on the camera.
- Set the Shutter speed slower for more streaks of light (e.g. 20s) and faster for less streaks of light (e.g. 5s).
- Alternatively, Bulb mode can be used where you want control over how much time the shutter needs to be open. In this mode, the shutter will be open from the moment you press the shutter button until you release it (use a remote shutter to reduce shaking while holding the shutter button) giving flexibility over timing the shot as a car enters the frame and then leaves the frame creating a long streak of light.
- Use a higher f/number between f/8 and f/16 if the photo is over exposed and requires lesser light in the photo. This will also ensure that the light streaks are very fine lines of red or yellow and not thick bright lines.
- Set a low ISO (e.g. ISO 100) for minimum noise.
- If in low light, the camera has trouble finding the correct focus, use Manual focus.
- Enable Long Exposure Noise Reduction setting if available in your camera to reduce the noise in the photo.
- This method can also be used to capture light trails of a light-decorated Merry-go-Round/Amusement rides in carnivals/funfairs in the night.
 |
| Example of Night Traffic Long Exposure |
| | Shutter Speed: 20s | f-stop: f/9 | ISO: 100 | Focal Length: 18mm | Flash: Not Fired | |
 |
| Example of Amusement Ride Long Exposure |
| | Shutter Speed: 1/3s | f-stop: f/6.3 | ISO: 320 | Focal Length: 40mm | Flash: Not Fired | |
Previous Article: Photography Techniques - Landscapes & Night Landscapes
Sunday, April 29, 2012
Photography Techniques - Landscapes & Night Landscapes
- Landscape:
- Use Wide lens (ranging from 20 to 35mm), Ultra Wide lens (10-22 mm) or Fish Eye lens (15mm) for capturing a wide landscape photo.
- Use Narrow Aperture (larger f/number) between f/8 to f/11 for higher depth of field.
- You can use Manual mode or Aperture Priority mode to set the aperture and adjust other settings for a proper exposure.
- Using a narrow aperture means getting less light on sensors. This needs to be compensated by slowing the shutter speed (like 1/30s) and/or increasing the ISO speed.
- Use the lowest possible ISO that can allow a properly exposed photo at the set Aperture and Shutter Speed.
- After increasing the ISO, if the shutter speed required is still slow, use a tripod to reduce any blurs.
- Compose a landscape photo based on the Rule of Thirds, place the horizon on the top or lower horizontal line and any object like tree or person on the vertical line or the point of intersection of two lines.
- If the sky has vivid clouds and more color, keep the horizon on the bottom line. If the sky is plain and bland, keep the horizon on top line and add a good foreground like a tree or rocks on the bottom line.
- Position the camera properly so that the horizon line comes straight in the photo. Use gridlines to align the horizon or use the Electronic Level if provided in the camera.
- Use Landscape mode in Picture Style Effects (if provided in the camera), which enhances the color of sky and greenery and makes the photo sharper.
- Use a Polarizer filter for darker skies and vivid greenery. It can also remove reflections from water surfaces for a clearer view of things under water, so that a water body appears as crystal clear.
- If the scene is too bright, then use a Neutral Density filter. It limits the amount of light entering the lens and helps to reduce over exposure of the photo. If the foreground needs to be brighter and the background (like the sky & clouds) needs to be darker, then use a Graduated Neutral Density filter. It limits light on one side (e.g. top) and allows light on other side (e.g. bottom), due to which the sky which is in the top part of the photo will appear darker than the foreground or subject which is in the bottom part of the photo.
- For a group shot of people in front of monument or scenery, use the same settings as landscape, but enable flash to illuminate the faces of the subjects and remove any shadows under eyes.
- For a higher dynamic range of light and colors in a landscape, use RAW photo format and HDR technique for a beautiful high contrast photo.
- For capturing an artistic photo of a subject in foreground (like a person, tree or mountain) and a big Sun/Moon in the background, use a long focal length prime or zoom (telephoto) lens.
- Night Landscape:
- Use medium Aperture (mid f/number) between f/5.6 to f/8 for high depth of field as well as to get more light in the lens.
- Use a slower shutter speed (e.g. 3s to 30s) for more light.
- To stabilize the camera, a tripod is neccessary. Use a cable release, wireless remote or set the timer to 2 seconds to further reduce the blurs caused by pressing the shutter button.
- You can use Manual mode or Aperture Priority mode to set the aperture and adjust other settings for a proper exposure.
- For more light, set a higher ISO (e.g. ISO 200 to 400). However, use the lowest possible ISO that can allow a properly exposed photo at the set Aperture and Shutter Speed without much noise.
- Enable Long Exposure Noise Reduction setting if available in your camera to reduce the noise in the photo.
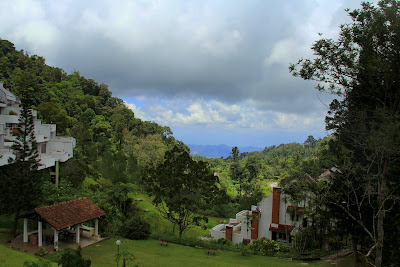 |
| Example of Landscape |
| | Shutter Speed: 1/400s | f-stop: f/8 | ISO: 100 | Focal Length: 18mm | Flash: Not Fired | |
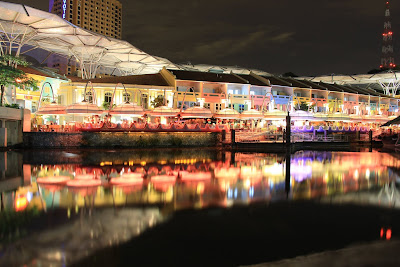 |
| Example of Night Landscape |
| | Shutter Speed: 15s | f-stop: f/5.6 | ISO: 125 | Focal Length: 18mm | Flash: Not Fired | |
Previous Article: Photography Techniques - Portraits & Night Portraits
Next Article: Photography Techniques - Night Traffic
Photography Techniques - Portraits & Night Portraits
- Portraits:
- Use Prime (Fixed Focal) Lens which are faster and enable taking photo with a narrow depth of field.
- Use Wide Aperture (smaller f/number) between f/1.4 to f/4 for a narrow depth of field.
- If you are using a Zoom (Telephoto) lens, use the maximum focal length (highest zoom) and shoot from a distance from the subject for a narrow depth of field.
- You can use Manual mode or Aperture Priority mode to set the aperture and adjust other settings for a proper exposure.
- Use Flash for filling up the shadows on the face (like shadows under the eyes). If the flash is strong and washes out the photo in white, reduce the Flash Exposure Compensation for a softer flash
- If you are using external flash, point the flash at the ceiling or a wall for diffused lighting and an evenly lit face of the subject.
- Always focus on the eyes of the subject. People like a photo with sharp eyes even if other parts are out of focus.
- Try to position the subject in front of a plain, dark background like a field of grass or a wall for placing maximum attention on the subject.
- Ensure that the distance between the subject and background is greater for more blurred background.
- Use a Soft Focus filter (an actual filter attached to the lens or a software photographic effect built in the camera) for a dreamy effect. This can also be achieved using PC software like Picasa, Photoshop etc.
- Compose a portrait based on the Rule of Thirds, place the eyes of the subject along the top horizontal line of the grid and the body along a vertical line.
- Use a warmer color temperature for candle light / sunset effect (set the Lighting/White Balance to Shade or Cloudy.
- Use Portrait mode in Picture Style Effects (if provided in the camera), which enhances skin tones and hair color and makes the photo look softer.
- Use the lowest possible ISO (e.g. ISO 100 if taking a photo under bright lights) that can allow a properly exposed photo at the set Aperture and Shutter Speed.

Example of Portrait | Shutter Speed: 1/400s | f-stop: f/4.5 | ISO: 100 | Focal Length: 50mm | Flash: Not Fired |
- Night Portraits:
- Use the largest aperture (smallest f/number e.g. f/1.8) which is supported by the lens for a blurred background. This makes the background lights out of focus and they look like big balls of colorful light.
- If the background is required in the photo, then use a smaller aperture (e.g. f/8) to get both the subject and the background in focus. This type of photo is in between a Portrait and Landscape where both the subject and background are important.
- Use the slowest shutter speed which can be used without getting a blurry image (e.g. 1/20s).
- Use built-in or external flash to illuminate the subject. Use Flash Exposure Compensation, if required, to reduce the burnout caused by excessive light from the flash. Using these settings, the background will not be fully dark and the subject will also be properly illuminated.
- For more light, set a higher ISO (e.g. ISO 200 to 400). However, use the lowest possible ISO that can allow a properly exposed photo at the set Aperture and Shutter Speed without much noise.
 |
| Example of Night Portrait |
| | Shutter Speed: 1/15s | f-stop: f/9 | ISO: 400 | Focal Length: 50mm | Flash: Fired | |
Previous Article: Manual Mode Settings in a DSLR
Next Article: Photography Techniques - Landscapes & Night Landscapes
Sunday, March 25, 2012
Manual Mode Settings in a DSLR
To take incredible photos in manual modes, one needs to learn about each of the settings and their impact on photos. The important settings used in manual settings are:
- Shutter Speed: Shutter speed determines the time that the camera's shutter needs to be open to capture light on the sensors. To put in simpler terms, consider a human eye. Assume that you have closed your eyes and then open and again close the eyelids fast and you see for a short moment the objects in front of you. If you blink slowly, you can see more clearly than if you are blinking faster. Similarly, the higher the shutter speed of the camera, the less light is captured by the sensors and lower the speed means more light captured. The shutter speed is measured in seconds or fraction of seconds, e.g. 1/1000 s, 1/500 s, 1/250 s, 1/2 (or 0.5) s, 1 s, 30 s. Hence, a faster shutter speed (e.g. 1/1000) means less light enters the camera and captures an object frozen in time. A slower shutter speed (e.g. 1 second) means more light enters the camera and captures movements of an objects as blurs.
- Ä For taking sport photos or fast moving cars and people, use a faster shutter speed.
- Ä For taking artistically blurred photos of waterfall, fountains, streams or sea with silky water effect, for night photography of traffic on highways or fireworks use slower shutter speed (a tripod is neccesary).
- Aperture: Aperture is the size of the pupil (diaphragm) of the camera lens and determines how much light enters the lens. In simpler terms, consider a human eye. In bright sunlight, the pupil of the eye becomes small to limit the amount of light entering the eye and at night the pupil becomes large to ensure more light enters the eye. The aperture of the camera is measured in f-number or f-stop which is a ratio of the focal length of the lens to the Diameter of the pupil e.g. f/8 (which means the diameter of the pupil is 1/8th of the focal length). A 100 mm focal length lens with an aperture of f/4 will have a pupil diameter of 25 mm. The larger the f-number the smaller is the aperture, i.e. f/8 is bigger aperture than f/16 and hence, f/8 enables more light to enter the camera than f/16. A smaller aperture (bigger f-number) increases the depth of field due to which near and far objects are in focus (sharp) and a larger aperture (smaller f-number) decreases the depth of field due to which the subject is in focus (sharp) and other near and far objects are out of focus (blurred) making the subject the centre of attraction and blurring all the distracting background.
- Ä For taking photos in low light or night photography use a larger aperture (e.g. f/2.8).
- Ä For taking long exposure photos of waterfall, fountains, streams in bright light, use a smaller aperture (e.g. f/11)
- Ä For portrait photos with blurred background (Bokeh effect), use a larger aperture (e.g. f/2.8).
- Ä For landscape photos and people group shot with background in focus, use a smaller aperture (e.g. f/8)
- ISO: ISO (or Film Speed) is used to adjust the sensitivity of the camera sensors to light. In simpler term, consider a human eye. When you go from a well lit area to a dark room, first you can't see anything. Slowly, as your eyes become more sensitive to darkness, you will begin to see the objects in the room (although less clearly than you can see in daylight). If you go from a dark room to a brightly lit room, the amount of light you see will be too much and the eyes again takes time to adjust to the bright light after which you can see clearly. Similarly, in bright daylight a low ISO (e.g. ISO 100) can take a good bright photo, but in low light the same ISO will take dark photo (or completely black). Increasing the ISO (e.g. ISO 1600) makes the camera more sensitive to light and hence enables to take a bright photo in low light. However, increasing the ISO makes the photo grainy (white spots) at the expense of more light and vice versa. Nevertheless, a grainy photo is better than no photo in darkness, so choose the lowest ISO number that the light will allow for a clearer photo. A high ISO also enables to use a faster shutter speed, hence it is called High Speed and for a low ISO the shutter speed needs to be slowed down, hence called Slow Speed.
- Ä In bright daylight use ISO 100 setting for a bright and clear photo.
- Ä In cloudy environment, use around ISO 400.
- Ä In low light and night photography use a high ISO setting (use the lowest of ISO rating giving the least grainy noise) like ISO 800 or 1600.
- Exposure Compensation: This setting allows the user to increase or decrease the exposure calculated by the camera. Sometimes the automatically calculated exposure value makes the photo under exposed or over exposed, which results in white objects looking grey or grey objects looking white respectively. To correct this, the user can explicitly increase or decrease the exposure compensation value to tell the camera that whatever looks grey is actually white and whatever looks white is actually grey respectively. Exposure Compensation settings are measured in EV (Exposure Value), 0 being the normal exposure, +1, +2 and so on being Over Exposed and -1, -2 and so on being Under Exposed. If a photo looks bright, reducing the EV makes it darker and vice versa. Exposure Compensation is used for taking HDR (High Dynamic Range) photos where the user takes three (or more) photos, one Over Exposed, one Under Exposed and one Normal Exposure photo and combining these photos with a software (like Adobe Photoshop CS2 and above) on PC or on the camera itself if it supports this feature. The resulting photo has high contrast, contains a greater dynamic range between the lightest and darkest areas of a photo and looks more or like similar to what we see with our eyes. DSLRs have a feature for taking three photos with different exposure which is called Auto Exposure Bracketing (AEB). User can set how much difference in exposure (in terms of stops where each stop is +/- 1/3 EV) is required between consecutive photos and then pressing the shutter button automatically takes three photos with the set exposures. Some cameras which have HDR feature do all these steps in camera all at once.
- Ä Use Exposure Compensation for correcting an underexposed or overexposed photo.
- Ä Under expose a photo of sunset for an artistic effect.
- Ä Use AEB for creating HDR photos.
- White Balance: White Balance (or Color Balance or Color Temperature) is used to adjust the color intensities in a photo and make an white object look white resulting in natural looking colors in the photo. If a photo is taken under an incandescent light bulb, candle flame or in evening then a white object looks yellowish due to the Color Temperature of the light source. If a photo is taken under cloudy or overcast sky, then the white object looks bluish. If a photo taken in bright sunlight, using a flash or under a flourescent light bulb, then white object looks white. To correct the yellowish/bluish color of the white object, adjust the White Balance (Color Temperature) in the camera to tell the camera that the photo is being taken in yellowish/bluish light and treat the source light like it is white (sunlight/flash). Thus, the mapping of yellow/bluish to white makes the object look like it is taken under sunlight and hence it looks white. The options for correcting white balance in a camera are: Auto, Sunny(or Daylight), Shade, Cloudy, Tungsten, Sunset, White Fluorescent Light, Flash or Custom. Color Temperature represents the surface temperature of a black metal body which when heated, emits Red light, then Yellow, then White and lastly Blue light. Also, due to atmosphere, when the sun travels across the sky, at sunrise/sunset it appears to be red/orange/yellow and when it is directly overhead it appears white. When the sun is covered by clouds then it appears bluish. This effect is not due to black body heating as such, but due to scattering of light by the atmosphere. However, the color temperature due to this is similar to that of a heated black body and it is measured in Kelvins. e.g. the color temperature of candle flame or sunrise/sunset is 1850K and an incandescent light bulb is 2700-3300K which are termed as Warm colors, daylight at noon, flash and fluorescent light at 5000-6000K and Cloudy sky at 6500K are termed as Cold colors. Using these ratings it is also possible to manually set the appropriate Color Temperature using the Custom settings of White Balance in the camera. The user can also focus on a white object and adjust the White Balance to that telling the camera that this object is white and shift the color spectrum (towards warmer or cooler temperature) according to this object's color.
- Ä Use White Balance to correct a photo under different light conditions e.g. to show a photo taken under incandescent light bulb like it has been taken under fluorescent light.
- Ä Use White Balance to artistically make the photos Warm (Reddish/Yellowish) or Cool (Bluish) e.g. to show a photo taken under fluorescent light like it has been taken in candle light.


A photo's exposure (light or dark photo) can be primarily controlled by Aperture, Shutter Speed and ISO (combined called as the Exposure Triangle) and to a measure by the Exposure Compensation also. Since we are familiar with the settings of a DSLR and their overall use in various types of artistic photography, we will learn exactly how these settings are used in various techniques like Fireworks, Waterfall, Portrait Landscape and others.
Previous Article: Photography Modes in a Camera
Next Article: Photography Techniques - Portraits & Night Portraits
Photography Modes in a Camera
Point and Shoot Digital Cameras are easy to use with built-in photography modes that manages all the camera settings and does all the work for the person using them. Modes like Automatic, Landscape, Portraits, Night Photography and Macro can be found on most of the modern DigiCams. DSLRs also have these features built-in for basic photography as well as some advance modes for those users who want better control and great photos from their cameras.
It is crucial to know these modes very well to properly utilise them at the proper moment and lighting conditions for capturing a good photo. Some of these modes found in most of digital cameras are:
- Automatic Modes: These modes can be used for a quick photo without any manual settings by the user or for people who want a high quality photo at the click of a single button. The most common automatic modes in a Point and Shoot or a DSLR are:
- Full Automatic: This mode lets the user click a photo in any shooting condition. The camera analyses the lighting conditions and automatically manages the settings like shutter speed, aperture, ISO setting, focus, white balance and flash to take the most suitable photo. Many point and shoot camera owners use this setting to take most of their photos because it removes the complications of adjusting the settings for each photo and is simple as just clicking a button to take a photo. Entry level DSLR users can even use the automatic mode to capture photos which are high quality and better than point and shoots without the complexity of manual settings in DSLR.
- Ä Use this mode to take a quick shot if there is no time to do manual settings or to set another more appropriate shooting mode.
- Landscape: The automatic landscape mode is used to take wide pictures of scenery like beaches, mountains and city skylines. In this mode, the camera automatically adjusts the settings to a small aperture (larger f-number e.g. f/11) to set a large depth of field which captures photos of the full landscape with everything in focus. Since the aperture is small, if the light is insufficient the camera adjusts the shutter to slower speed and hence the camera needs to be put on a tripod to reduce blurring due to shakes. For low light condition, it is feasible to use the Night Landscape mode if supported by the camera.
- Ä Use this mode to take wide photos of beaches, mountains and city skylines or to take a group photo of people in front of a monument/tourist attraction so that both subject and background are in focus.
- Portrait: The automatic portrait mode is used to take pictures of people usually nearer to the camera. In this mode, the camera automatically adjusts the settings to a large aperture (smaller f-number e.g. f/2.8) to set a narrow depth of field which captures photos of the subject in focus and the background out of focus (blurred). Most camera models also enable the flash in this mode to fill the face of the subject with light so that shadows are reduced. Also, in most cameras, the skin tones are made to look more natural and softer in the photos. This mode works best if used in proper lighting. If you take a Portrait photo in darkness like a theatre or pub then you may be able to take photo of the subject who will look very bright (burnt out) with background all dark. In this case, use Night Portrait mode if supported by the camera.
- Ä Use this mode to take close up of people and isolate them from distracting backgrounds.
- Night Landscape: This mode is used to take landscape photos in low light conditions or at night. The camera adjusts a high ISO level and the shutter speed to be very slow (i.e. shutter is open for few seconds) to capture more light. Due to this, a tripod is absolutely neccesary to prevent blurry photos caused due to shakes.
- Ä Use this mode to take brightly lit city skyline photos at night or to capture traffic on highways which captures the headlights of the cards as long lines of continuous light.
- Night Portrait: This mode is used to take portrait photos in low light conditions like theatre/pubs or at night. Similar to Night Lanscape mode, this mode also sets a high ISO and opens the shutter for a longer time, but the flash fires off to illuminate the subject. This causes the photo to include the brightly lit person and also the background.
- Ä Use this mode to take photos of people in a party or pubs (in low light situations), with nicely illuminated backgrounds.
- Sunset: This mode is used to capture vibrantly colored photos of sky at sunrise or sunset. The camera automatically sets the appropriate saturation, white balance and temperature to capture a vivid photo.
- Ä Use this mode to take photos of sun rising or setting and its colorful effects on the clouds.
- Sports: Sports mode lets the user take photos of objects moving at a high speed like car race or people playing sports like football/basketball etc. The camera automatically sets a high shutter speed to capture a still of the moving object. Since the shutter speed is high, in low light conditions, the photo will come dark or totally black. Hence, for a perfect sports photo the lighting conditions should be bright.
- Ä Use this mode to take frozen photos of cars, people playing sports, running pets and wildlife.
- Macro: Macro mode lets the user take closer photograph of objects like flowers, insects and other small objects like coins. In macro mode, the depth of field is very narrow and hence some part of the object may be out of focus if the camera is held at an angle to the object. e.g. The petals of a flower may be blurred if the focus is on the stigma and the camera is held at an angle to the flower. Also, the use of tripod is essential to steady the shot since even a small shake can cause the photo to be out of focus.
- Ä Use this mode to take extreme close up (withing centimeters of the object) of small objects like flowers and insects.
- Fireworks: Fireworks mode is similar to Night Landscape mode, but having a longer shutter speed. This mode is used to capture colorful and bright photos of fireworks. The longer shutter speed enables the full explosion of the fireworks to be captured in one photo which creates photos with long streaks of light as the burning fireworks spread across the sky.
- Ä Use this mode to take wide photos of fireworks or even of night traffic in city highways.
- Panorama: This mode can be used to take extremely wide photos of landscapes. In this mode, when the user takes the first photo, the camera uses a part of that photo as a mask to align the next photo. After the user takes a few overlapping photos, either the camera automatically stitches the photos to form one continuous photo or stores them so the user can later manually join them using a software. Some cameras have options to choose to rotate from left to right or right to left. Some of the latest Sony cameras (Point and Shoots and DSLRs both) can take a panoramic photo by letting the user sweep from one side to the other in a continuous motion instead of clicking individual photos. Rotating the camera on a tripod will help align the photos in a straight line.
- Ä Use this mode to take wide photos of scenery or a city skyline. Panoramic photo of full 360 degrees captures the full essence of the location.
- Manual Modes (PASM): These modes are semi-automatic or fully manual, where the user selects one or more settings to be fixed and the rest of the settings are set by the camera. The most common manual modes found in DSLRs (and in some Point and Shoot cameras) are:
- Program Mode (P): In this mode, the camera automatically sets the shutter speed and aperture for a suitable exposure of the photo depending on the lighting. The user can manually select any other settings like AF mode, drive mode, flash etc as per their requirements.
- Ä Use this mode when more control is needed over settings like ISO, Flash etc than Full Automatic mode.
- Aperture Priority (A/Av): In this mode, the user sets the aperture and the camera sets the other options like shutter speed, ISO, white balance after analysing the scene for a proper exposure.
- Ä Set a smaller aperture (high f-number) for a wider depth of field (landscape) or a higher aperture (low f-number) for a narrow depth of field (portrait).
- Shutter Priority (S/Tv): In this mode, the user sets the shutter speed and the camera sets the other options like aperture, ISO, white balance after analysing the scene for a proper exposure.
- Ä Set a faster shutter speed for sports and slower shutter speed for night photography, night traffic or waterfall shot
- Full Manual (M): This is a user customisable mode in which the user sets the shutter speed, aperture, exposure compensation, ISO (can be Manual or Automatic) manually to obtain a correct exposure of the photo.
- Ä Use this mode when full control is required over the settings and can be used for any type of photography like Portrait, Landscape, Night Photography, Waterfall (silky water effect).
- Bulb (B): In this mode, the shutter remains open as long as the shutter button is pressed down and closes when shutter button is released. Bulb mode can be used for low light conditions where longer shutter times are required. A tripod is very essential to keep the camera still and reduce blur. Also, a remote controller/cable release can be used or alternatively set the timer so that the shake from the pressing of the shutter button does not cause a blur.
- Ä Use Bulb mode to take photos of fireworks and night photography.
The automatic modes are as simple as clicking one button to take a beautiful photo, if the person knows which mode is best for which lighting conditions. However, the person who knows the basic aspects of photography can use the manual modes to capture even more beautiful photos. We will delve into the basics of capturing a perfectly exposed photo using manual modes in the next post.
Previous Article: Choosing the right DSLR for Entry Level Photographers.......Next Article: Manual Mode Settings in DSLR Camera
Monday, March 12, 2012
Choosing the Right DSLR for Entry Level Photographers
- Point and Shoot Film Camera: Point and shoot cameras are very easy to handle and to take a photograph the person needs to point the camera towards the subject and click the shutter button. All the settings and adjustments are managed by the camera. Few years back Point and Shoot Film Cameras were widely used by the general population. These had to be loaded with a photographic film which could be used to shoot limited number of shots per film roll. After taking all the shots in the roll, the film needed to be re-wound back (either manually or automatically using battery power) in the roll for further processing. While loading and unloading, special care needed to be taken not to expose the film to light since that would destroy the film. Then the film was sent to be developed onto paper as photographs. There was no guarantee that the picture would come as desired since the lightings and exposure were set by the camera automatically and the view finder just gave a general view of the subjects (and not the same view as the film captured).
- Point and Shoot Digital Camera (Digicam): At the advent of Digital Point and Shoot Cameras, most of the shortcomings of film cameras went away. People could now shoot more photos without the hassle & cost of loading/unloading a film roll, review the photos immediately, re-take the shot if the photo is not proper and deleting the undesired photos. The images can be edited in the camera itself or using a software, printed as per requirement and shared with others using internet. The convenience, ease of use and portability of digital cameras led to the massive decline, if not extinction, of film cameras. Being a Point and Shoot, the image adjustments while taking a photo are managed by the camera and being Digital, the camera includes various automatic modes of shooting like portrait, landscape, night photo and in-camera image manipulation techniques (like Panorama).
- Single Lens Reflex (SLR) Film Camera: The Single Lens Reflex cameras are the successors of Twin Lens Reflex cameras in which two lenses were used, one for projecting the image on a film and other for a view finder. Since the paths of lights were different for viewer and film, it caused some framing errors for close up shots. To avoid this, SLRs were created which constitute of a single lens which is used to project the image on the film and a mirror and prism system to reflect the same image to the view finder. When the shutter button is pressed, this mirror moves away and the image is projected on the film directly. SLRs are expensive and mostly popular with professional photographers and enthusiasts who cannot compromise on the image quality and need high customization for capturing a photo. SLR cameras employ interchangeable lenses that can be attached or removed as per the user requirements.
- Digital Single Lens Reflex (DSLR) Camera: DSLRs combine the customizations of an SLR and convenience of Digital cameras.
- To take candid photos or capture an interesting scene on the go.
- Where there is more priority on capturing an instantaneous photo than an excellent image quality.
- Immediate sharing with people via SMS, Email, Social networks or blogs.
- Geo-tagging of photos.
- For minimum use of flash or where flash needs to be used only for short distance.
- To use various in-built filters or image editing features like panorama or HDR (High Dynamic Range).
- Limited burst photos (multiple photos taken continuously) using either built-in software or 3 rd party apps, although mostly possible in brightly lit environment.
- Image quality is better than mobile cameras.
- Powerful telephoto (zoom) to take photos of subjects far away and wide photos to capture a large number of people standing short distance from the photographer.
- Due to the portability of the camera, it can be carried out on most occasions.
- Powerful flash to take better illuminated photos.
- To use various in-built filters or image editing features like panorama.
- Better burst photos than mobile cameras and in low light.
- Silent operation and much cheaper than DSLR cameras.
- Image quality is of utmost importance to take photos like professionals.
- If it is possible to carry out the heavy camera along with other lens in a separate bag.
- Where there is a need to take super wide or long distance photos with consistent and high image quality.
- Night portraits or landscape needs to be taken in low light.
- To take RAW photographs with full details and no compression to be modified later on a computer.
- To take portraits with highly blurred backgrounds (called Bokeh effect).
- Very high burst rate with good image quality even in very low light.
- Larger image sensor which results in less grainy photos in low light than a Point and Shoot which has smaller sensor.
- Interchangeable, High Quality lenses that can be used for customizing the camera for specific purposes like Portraits, Landscapes, Architecture, Macro and Wildlife Photography.
- Startup time in a DSLR is very low, hence can be used to capture quick shots after switching on the camera from switched off.
- Large variety of accessories to choose from, like external flash, wired/wireless remote control and additional battery packs.
- Camera Body: A camera body is the main unit of the DSLR Camera into which different lens can be attached. For the average users, the main body doesn’t make much difference in photo quality. Also, the difference between an entry level DSLR body and a higher end body are only a few features such as Megapixel, Burst Ratio, video capability. So, if a person wants to learn photography at beginner level, choose an entry level DSLR body like Canon EOS 550D / 1100D or Nikon D3100 / D5100. Frankly, the higher Megapixel rating doesn’t make much difference for the average user unless you want to make huge poster prints of your photographs. I have an 18 megapixel camera body, but mostly I use 8 megapixel for general photography. For a good quality digital photo and small prints, anything more than 5 Megapixel is OK.
- Lens: The high image quality of a DSLR depends mostly on a good lens rather than an expensive body and hence, Lens is the most important part of the DSLR. The size of the lens and its construction are the factors that allow more light to enter the camera and hence give excellent results even in low light or fast enough for taking sports photos.There are several types of lens, most common of them being:
- Wide: This lens allows capturing a bigger & wider image, so it can be used to take wide landscape photos or capture a big group of people standing close to the photographer. This lens can be classified into Wide, Super Wide and Fish-Eye lens based on the angle of view they can capture.
- Telephoto (Zoom): This lens allows capturing objects which are far away from the photographer and can be used for wildlife photography or sports. The focal length of the lens can be varied from a specific minimum to a maximum. e.g. an 18-55 lens can take photos from 18mm to 55mm focal length. The magnification factor is 55/18 = 3 i.e. this lens has a 3X optical zoom.
- Macro: This lens allows capturing extreme close-ups of small objects like a flower or a bug. An accessory lens called Close-up lens can also be used attached to other lens to take close up or macro photos.
- Fixed-Focal (Prime): This lens allows capturing excellent portraits with a high depth of field (giving a Bokeh or blurred background effect). Due to their simple construction and non-moving parts Prime lens are cheaper, smaller and lighter to carry. They have a large maximum aperture size to take in more light to the camera sensors and due to this they can be used for a faster shutter speed (i.e. less exposing time required).
- Extender (Teleconvertor): This lens is used along with another lens to increase its effective range. e.g. a 2.0X Extender can extend the focal length of a 50mm lens to 100mm. Normally the cost of an extender and a moderate zoom lens is cheaper than the cost of super zoom lens.
For an entry level photographer, divide your budget so that you can maximize the cost of lens and minimize the cost for body. The type of lens to be chosen is based on the type of photography the person wants to take part in.If you want to take landscape or architectural photos, go for Wide lens.For taking extreme close-ups of miniature objects, get a Macro lens.For taking wildlife or bird photography, get a telephoto lens with higher focal range like a 75-300 mm lens.For general purpose photography get a telephoto lens with a focal range from wide to telephoto, e.g. an 18-55 mm lens can be used for general photography from wide (18mm) to 55mm telephoto. However, if you require a higher range of focal length, then go for a 55-250 mm lens which can take photos of very far objects.Instead of getting two different telephoto lenses and changing them regularly, I preferred to choose an 18-200 mm lens which covers a large range of focal lengths (18mm Wide to 200mm Telephoto). Although, the cost of this one lens is somewhat higher than the total cost of two separate lenses, the quality difference is minimal and the convenience of carrying only one lens makes it worth the money.For taking amazing portraits, get a Prime lens. These lenses are very cheap, fast and take beautiful pictures with blurred backgrounds even in very low light situations without the use of flash. These factors of Prime lens make it a MUST HAVE lens in every photographer’s arsenal. The cheapest of the Prime lens (from Canon’s product range) is Canon EF 50 f1.8 II which comes for around S$150. Its faster brother EF 50 f1.4 USM is a bit costlier, but can be used to take faster photos with a bigger aperture (f1.4 instead of f1.8). -
- Filters:
- Clear Filters: These filters have no effect on the photos captured, but are simply used to add some protection to the main lens from dust, water or cracking from a fall.
- UV Filters: These are used to block the Ultra Violet rays that can distort a photo in bright day light.
- Polarizing Filters: These are used to reduce glare from the surface of non-metallic objects or the reflections from water surface. Due to this effect, water surface looks transparent instead of reflecting the sky. Polarizer blocks some amount of light and hence needs more exposure time to compensate for that. Due to this effect, a photo of sky is darkened a bit and looks more vivid in the photo.
- Neutral Density Filter: This filter blocks some amount of light and hence is used where longer exposures are required, but the surroundings are brighter. So, for taking a longer exposure photo of a water fall in bright sunlight, ND Filter is used to reduce the amount of light entering the camera without affecting the color balance of the photo.
- External Flash: Even though the internal flash built in cameras are adequate for most portraits for a newbie photographer, external flash add-on provides improved design like moveable flash to point the light at ceiling for a diffused light on the subject. External flash is typically mounted on a camera using the hot-shoe mount and mostly used for capturing portraits. A separate ring-type flash is also available which can be attached to the front of the lens to illuminate the subject in Macro photography. For a beginner in photography, external flash is not a mandatory accessory and can be purchased later for portrait photography as and when the confidence and experience of the person increases.
- External Battery: Usually, the battery included with the camera is more than enough for casual photographers and lasts for thousands of photos without flash and hundreds with flash. For those who go for photography trips in forests or places where there are limited options for re-charging the battery, external battery pack is a valuable accessory to be included in one’s arsenal. These packs are built in shapes that complement the camera design, can be attached to the camera and provide extra stability due to its weight and grip. There is also a shutter button positioned on the pack so that the photographer can take portrait photos using this conveniently positioned shutter button.
- Lens Cleaner: A DSLR being expensive, proper care needs to be taken by cleaning it regularly. A good lens cleaning kit with a blower, fine bristle brush, micro fiber cloth and cleaning solution will keep the camera healthy and the lens shiny. A small lens cleaning pen with brush on one side and a curved micro fiber head on the other is also a good alternative. It is always a good etiquette to keep a lens cleaner handy in the camera bag.
- Tripod: A tripod is very useful for taking photos in low light or night photography where the smallest of tremors can ruin a photograph. It can also be used to take beautiful photos of fireworks and silky water effect in waterfalls or take a group photo to include the cameraman themselves in the photo. A variant of tripod is the monopod, which has only one leg instead of the three legs of a tripod. Monopod can be used to stabilize the photos by anchoring the leg on ground and using a wall to support the photographer’s body and the monopod.
- Image Stabilization: For taking photos in low light or a far away object, the camera shake caused by unsteady hands tends to make the photos blurry. For a sharp image in low light, Image stabilization is built into either Camera body by moving the image sensor corresponding to the shake or in Lens by moving the lens elements corresponding to the shake. If you are choosing a telephoto lens then consider buying the ones with IS built in the lens itself. These lenses are costlier than non-stabilized lens, but the price is worth the hassles of getting blurred photos.e.g. Canon EF S 18-200 f3.5-5.6 “IS” is a lens having built-in Image Stabilization.This feature is referred by different names by the manufacturers e.g. Image Stabilization/IS (Canon), Vibration Reduction/VR (Nikon), Optical SteadyShot/Super Steady Shot (Sony), MegaOIS (Panasonic), Optical Stabilization/OS (Sigma), Vibration Compensation/VC (Tamron) and Shake Reduction/SR (Pentax).
- Auto-Focus mechanism: Modern camera lens features an in-built electronic automatic focus system which arranges the lens to focus on a particular object by half-pressing the shutter button. There are mainly two types of auto-focus systems: servo motor and ultrasonic drive. Servo motor are slow, noisy and consume more battery power to focus the lens, but are less costly; whereas ultrasonic drives are fast, silent and consume less battery power, but more costly.e.g. of servo motor auto-focus: Canon EF S 18-55 f3.5-5.6 ISe.g. of ultrasonic drive auto-focus: Canon EF-S 17-55 f2.8 IS “USM”This feature is referred by different names by the manufacturers e.g. USM (Canon), AF-S/Silent Wave (Nikon), SSM (Sony), SWD (Olympus), ESM (Panasonic), SDM (Pentax) and HSM (Sigma)
Photography | Prime Lens | Wide or Super Wide Lens | Macro Lens | Fish Eye Lens | Tele photo (Zoom Lens) | Extender | External Flash | Neutral Density Filter | Polarizer Filter | Tripod | External Battery Pack |
|---|---|---|---|---|---|---|---|---|---|---|---|
Portraits | P | P | |||||||||
Landscape | P | P | P | ||||||||
Night Photography (Landscape) | P | P | |||||||||
Waterfalls/Streams /Sea/Fountains with silky water effect | P | P | P | ||||||||
Wildlife/Bird Photography | P | P | P | P | |||||||
Sports | P | P | P | P | |||||||
Macro Photography | P | P | P | ||||||||
General Photography | P | P | P | P |
- Canon EOS 60D Main Body (CMOS Sensor shooting 18 MP photo and 1080p 30fps video)
- Canon EFS 18-200mm f4.0 to f5.6 IS Lens (Servo Auto-Focus, Image Stabilization)
- Canon EF 50mm f1.8 Prime Lens (Servo Auto-Focus)
- Polarizing Filter
- Tripod
- Lens Cleaning Kit and Lens Cleaner Pen
- Compact Camera Bag
- SDHC Memory Cards (16GB, 8GB and 4GB)